One of the things I love most about the Quest 2 is the ability to use the power of a VR-ready PC to enjoy VR games and experiences via the Oculus link cable. If you’re trying to connect to a PC, but your Oculus Quest 2 link cable isn’t detected, this article should be able to help. There are a number of common problems, and most are easily fixed by following the instructions laid out below.
If your Quest 2 link cable is not detected, ensure that you are using a USB 3.0 cable and port, make sure the Oculus software is installed on your PC, your graphics drivers are up to date, and enable the USB connection prompt if you don’t see this when connecting your Quest 2 to your computer.
Oculus Link Requirements For Quest 2
Before you connect your Quest 2 to a computer via a link cable, there are a number of things you need to do to set things up correctly and ensure that everything is working.
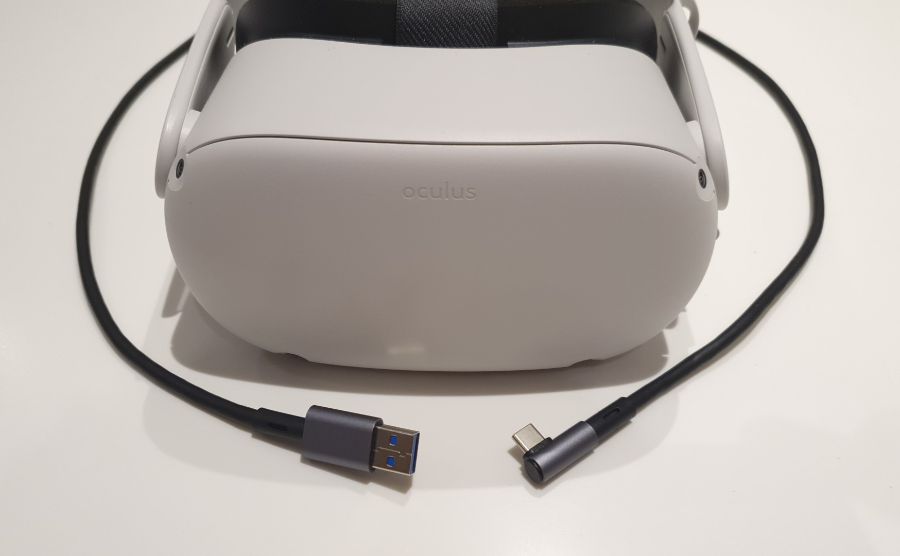
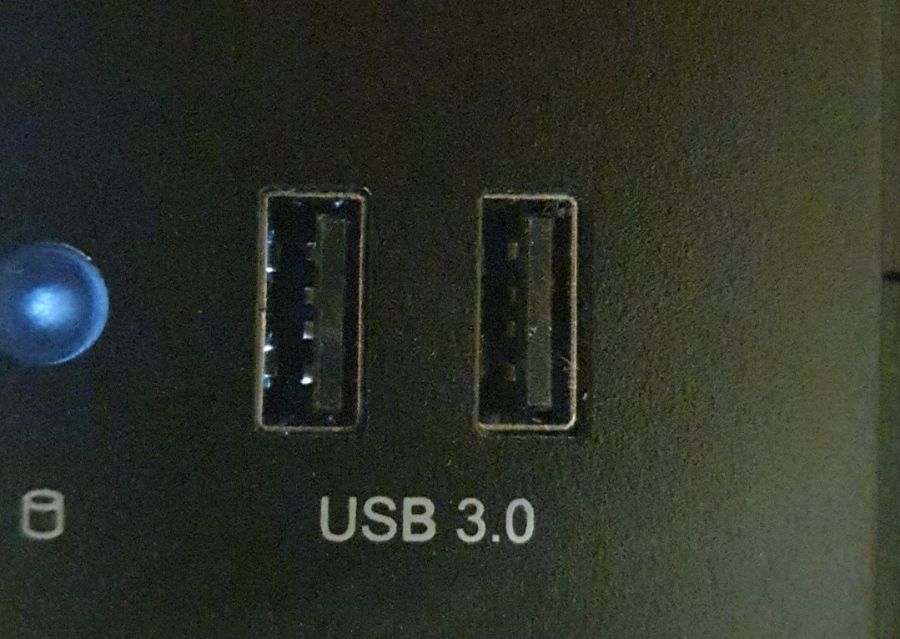
- Make sure you are using a compatible USB 3.0 cable.
- Make sure that you are connecting to a USB 3.0 port on your computer, and not an older USB 2.0 port.
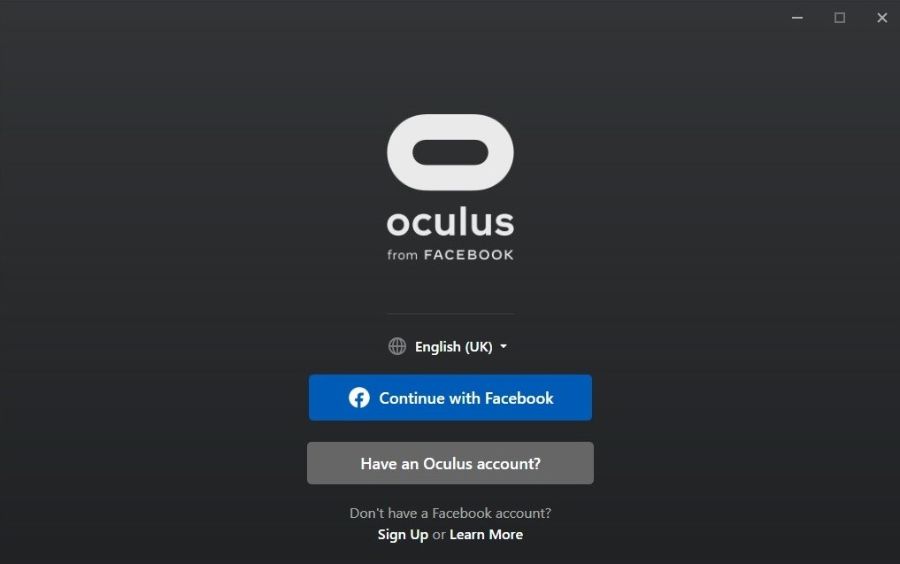
- Make sure that you have the Oculus software installed correctly on your computer.
- Make sure that your computer is compatible with Oculus Link. In particular, there are a number of graphics cards that are not supported, although compatibility is improving over time.
First Steps If Your Oculus Quest 2 Link Cable Is Not Detected
If you’ve made sure your hardware is suitable, and installed the Oculus software, but Oculus Link isn’t working when connecting your Quest 2 to your computer, there are some simple steps you can take to fix a lot of issues.
- Restart your PC and Quest 2. Make sure to fully switch off your Quest 2, and then restart it, rather than just putting it into sleep mode. Hold down the power button for 10 seconds to turn it off completely, then press and hold it again to turn it on.
- Unplug and replug the cable from your PC and the headset. Try plugging the USB-C connector in both ways round. This can sometimes resolve the issue, even though USB-C connectors should be reversible.
How To Get The Quest 2 Link Cable To Work
If you’ve completed the steps above, you now need to check what happens when you plug the USB cable into your computer and headset.
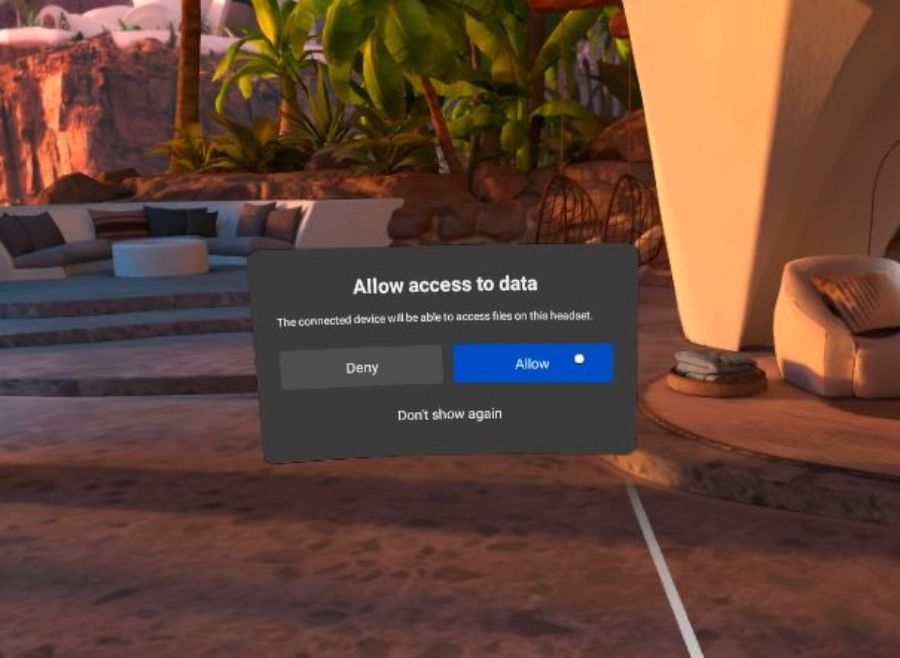
You should get a pop-up USB connection notification on your Quest 2 headset that says Allow Access To Data. You need to click Allow to enable your computer to connect to your Quest 2, and if you don’t see this notification, this is probably why your Oculus Link is not working. There is a way to fix this that I will cover in the next section.
Do not click “don’t show again”, as this will prevent your Quest 2 from connecting to your computer until you re-enable the USB connection prompt
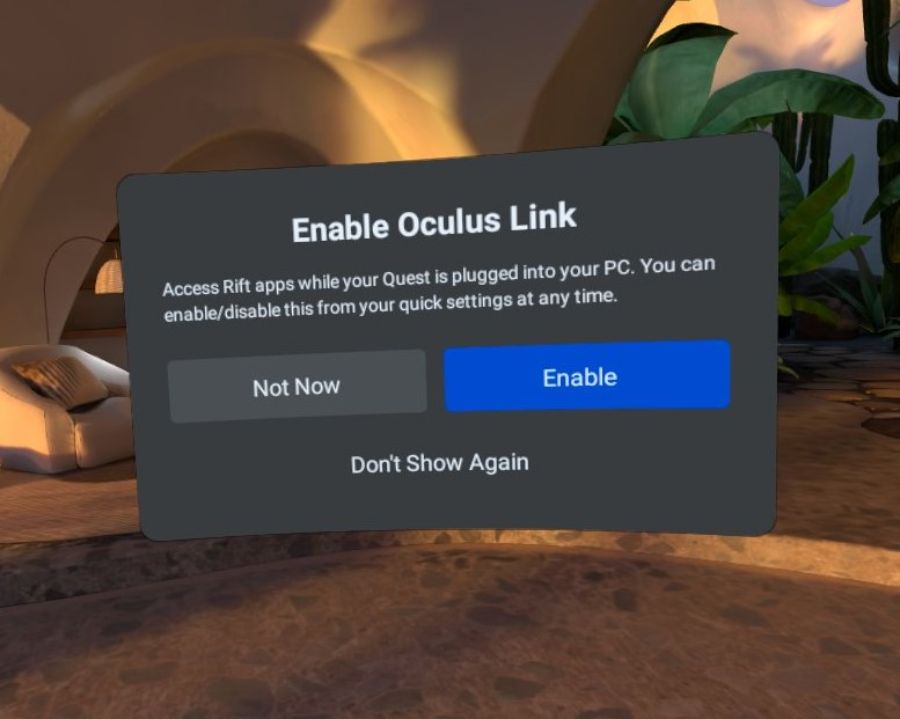
If you do see the notification, you will get a second notification saying Enable Oculus Link. You can either select Allow to launch this immediately, or Not Now if you would like to launch Oculus Link later. With the USB cable attached to your headset, you can launch Oculus Link at any time via the quick settings menu.
If you’ve followed this procedure, but aren’t able to connect your Quest 2 using the link cable, there is a problem that you need to solve. I’m going to cover all the common Oculus Link issues in the rest of this article to help you get your Oculus link working properly.
No USB Connection Prompt Preventing Oculus Link Working
It is a common problem for the USB connection prompt not to appear when connecting your Quest 2 to a computer resulting in the Oculus Quest 2 Link Cable not being detected. The most common reason for this is that the USB connection dialogue has been turned off and it needs to be turned on again.
This happened to me, and many other people, and is normally caused by clicking “Don’t Show Again” instead of “Allow” when the USB connection prompt appeared. I assumed I would be able to turn the notification on again very easily, but this was not the case. The solution to this problem is to enable developer mode on your Quest 2, which will enable you to access the Developer Settings menu to restore this dialogue box.
If your link cable was previously working, and now it is not, it is possible that you made the same mistake I did. Follow these steps to make the USB connection prompt appear again:
- Turn your Quest 2 off completely
- Sign up for a developer account at the Oculus developer website. This only takes a minute or two. You should merge your developer account with the Facebook account that you use on your Quest 2.
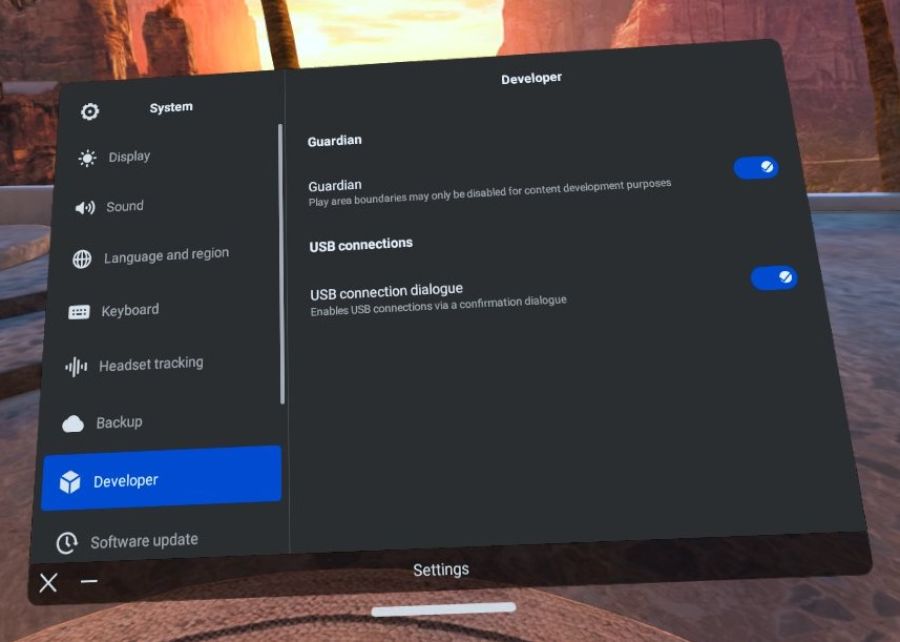
- Restart your Quest 2 and go to Settings, and then System.
- Select the Developer option and you should now see a setting that says USB connection dialogue settings – enable USB connections via a confirmation dialogue. Click on the button next to this.
- Connect your Quest 2 to your computer via the link cable and the USB connection dialogue box should now appear. Select Allow, and you should then get a second notification that says Enable Oculus Link – Access Rift apps while your Quest is plugged into your PC.
- You can enable/disable this from your Quick Settings at any time. You can either select Enable to enter Oculus Link mode now, or Not Now, to dismiss the notification. Don’t click Don’t Show Again, unless you have enabled Developer Mode.
USB Cable Problems With Oculus Link
USB cable or USB port problems are very common causes of a Quest 2 link cable not working There are a number of issues with the USB connection that can prevent Oculus Link from working.
You don’t have to use the official link cable, but you do need to be careful to ensure that whatever cable you use is capable of providing power and transferring data at sufficient speeds. This means you need a high-quality USB 3.0 cable for Oculus Link to work properly.
I don’t use the official link cable as I felt that it was overpriced, so I decided to buy a 3rd party USB 3.0 cable. There are many compatible cables now available for Quest 2. Meta recommends a cable that is at least 3m (10ft) long, but I would strongly recommend opting for a 5m (16ft) cable as this will give you considerably more freedom for room-scale VR.
Remember that you will need a cable with a USB-C connector at one end to connect to your Quest 2. Whilst you can get an adapter to connect a USB-A connector to a USB-C port, this can impact the function of the cable, so is best avoided.
It is a good idea to try multiple USB 3.0 ports on your computer if you are having difficulties getting Oculus Link to work. USB ports can be temperamental at times, and you may find that one USB port works perfectly for Oculus Link, while other ports do not work at all.
If you want to check whether your USB cable and port are suitable for Oculus Link, you can run a USB speed test via the Oculus software on your PC.
- Use a USB 3.0 cable to connect your Quest 2 to a USB 3.0 port on your computer.
- Open the Oculus Software on your PC and navigate to the Devices tab.
- Select Quest 2 and Touch and a menu will slide out from the right.
- Scroll to the bottom of this menu and select USB Test.
- The test will only take about 10 seconds and it will tell you whether the cable is compatible with Oculus Link and whether it is connected in USB 3 mode, and what the data transfer bandwidth is.
Turn Off Air Link If You Want To Use The Quest 2 Link cable
You can also connect your Quest 2 to a computer via WiFi using a feature called Air Link. This is currently an experimental feature that must be enabled via the Experimental settings menu. You cannot use the physical link cable to connect to your computer if Air Link is enabled in the settings menu.
Of note, you will still get the USB connection notification when you connect your Quest 2, and you can transfer files to and from your computer via a USB cable, but you will only have the option to use Air Link.
If you want to use Oculus Link via a physical cable, you need to go to the Experimental settings menu and toggle Air Link off. Once you have done this, you can connect your Quest 2 by USB cable to your computer and you should receive a notification asking whether you want to Enable Oculus Link.
Oculus Drivers Can Prevent Oculus Link From Working
If nothing has worked so far, and your Quest 2 still isn’t detected when you connect the link cable, I would recommend reinstalling the Oculus drivers on your computer. Bear in mind that a driver issue can cause problems even if the Oculus software appears to work normally on your PC.
You should find the installation files for the Oculus drivers in the following file location. C:\Program Files\Oculus\Support\oculus-drivers\oculus-driver.exe. The exact location will differ depending on whether you install the Oculus software in the default installation path.
You can also uninstall the Oculus software and reinstall it, to ensure that it is working correctly. You can download the Oculus software here.
Log Out Of The Oculus Software
Oculus Link will only work if you have a correctly installed version of the Oculus software and you are logged into your Oculus account on your computer. For some reason, logging out of the Oculus software and logging in again can sometimes fix some Quest 2 link cable not detected issues.
Click on the settings tab in the Oculus software and then click Log Out. You can log in again immediately and then try using the link cable on your Quest 2 again.
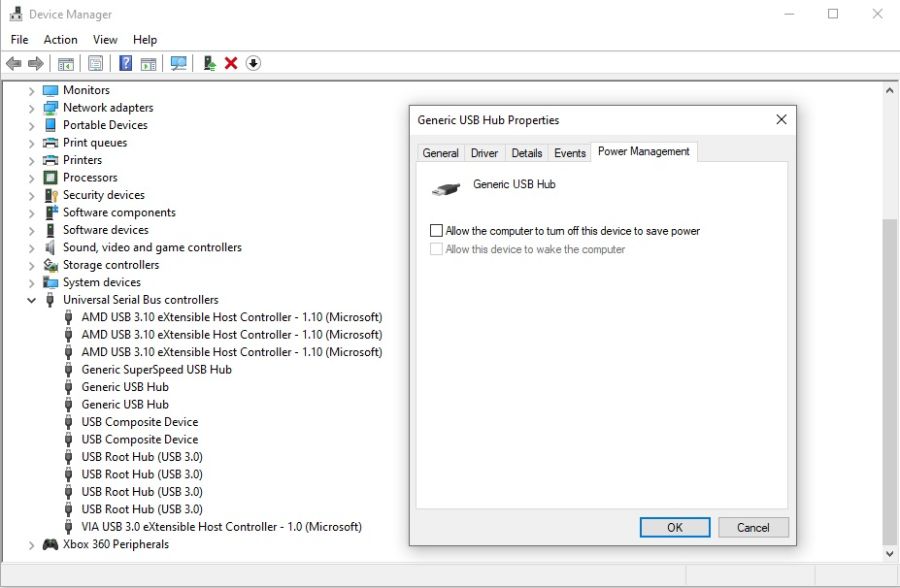
Turn Off Power Management For Your USB Ports
If your Oculus Link keeps disconnecting, the problem may be due to Windows power management settings for your USB ports. By default, Windows will try to save power by reducing power to USB ports that are not in use. This can sometimes result in the USB port that you are using for the Quest 2 link cable to lose power. I recommend you change the Windows power management using the following steps.
- Open Windows “Device Manager” and then click on “Universal Serial Bus controllers” to expand the list.
- Right-click “Generic USB Hub” (there may be more than one) and then select “Properties”.
- Click the “Power Management” tab, and then de-select “Allow the computer to turn off this device to save power”.
- Repeat this for any other “Generic USB hub” listings.
- Unplug the USB cable from your computer and Quest 2 and then plug it in again.
Update Your Graphics Drivers
Out-of-date graphics drivers are actually quite a common cause of Oculus Quest 2 link cable not being detected, and can also result in Oculus Link loading forever, or getting stuck with a black screen when you try to connect.
If everything seems to be set up correctly, but when you click to connect to Oculus Link and you just see 3 dots on the screen indicating it is loading, or a black screen, that never changes, it is highly likely to be a graphics driver problem.
One of the best ways to update your graphics drivers, and to keep them up-to-date is to use graphics update software for your brand of graphics card.
Download the AMD software for driver updates if you have an AMD graphics card.
Download GeForce Experience if you have an NVidia graphics card.
Once you have the relevant software installed, you will be able to download and install any updated drivers. You can also enable the software to check for driver updates over time, and download and install them.
Factory Reset Your Oculus Quest 2
If you’ve got this far, and nothing has worked, and you’re sure that your computer, USB ports, and USB cable are compatible with Oculus Link, you should consider doing a factory reset of your Quest 2. Although the Quest 2 is a quality VR headset, there are a number of software and hardware bugs that require a factory reset to resolve.
The good news is that all your purchases are saved to your Oculus/Meta account, so it’s pretty quick to pick up from where you left off after a factory reset.
You can do a factory reset of your Meta/Oculus Quest 2 by following these steps:
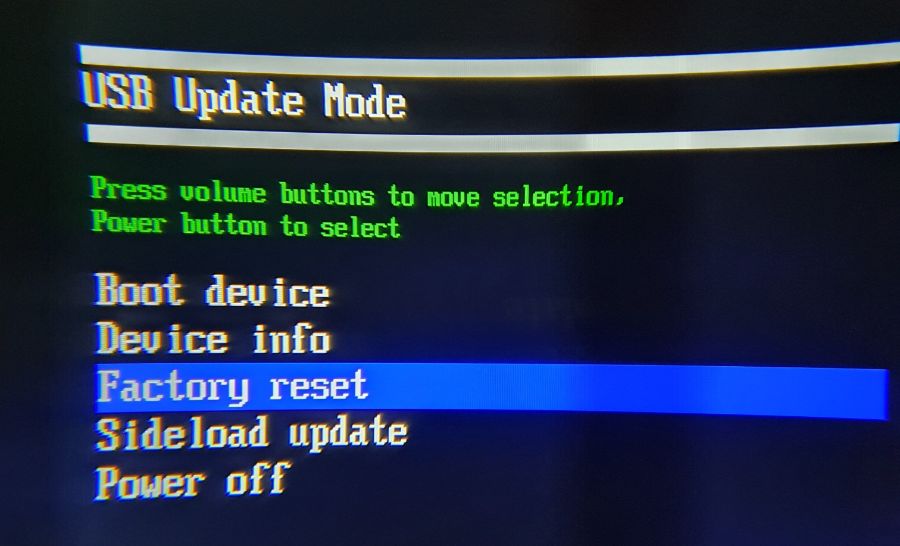
- With your Quest 2 off, hold down the power and volume buttons until you see a USB Update Mode menu appear on the screen.
- Select the Factory Reset option by navigating with the volume up and down buttons, and then click the power button to select it.
- Select “Yes, erase and factory reset” and press the power button to reset your Quest 2.
- Once the factory reset is complete, you will have to perform the initial setup and download all of your games again.