There may be times when you want to appear offline while using your Oculus Quest 2, or control who sees your activity. Thankfully, the Quest 2 has good tools for customizing how visible you are online, and there are several methods you can use to adjust your privacy settings.
You can appear offline on Oculus Quest 2 by either changing your status to “Appear Offline” on the Oculus desktop app, or changing your privacy settings to prevent users from seeing your activity. This can be done via your Quest 2 headset, the smartphone app, desktop app, or the Oculus website.
How To Appear Offline On Oculus Quest 2
There are several options to adjust how you appear to other users while using your Oculus Quest 2.
- You can use the Oculus app on your computer to make yourself appear offline.
- You can adjust the privacy settings on your Quest 2, on the phone app, the Oculus desktop app, or on the Oculus website to control who is able to see your profile and interact with you.
- You can block specific users from seeing your Quest 2 activity and prevent them from interacting with you.
This article is going to explain how to do each of these things and outline the advantages and disadvantages of each option.
How To Appear Offline On Quest 2 Using The Oculus Desktop App
One option to appear offline on Quest 2 is to toggle “Appear Offline” in the Oculus app on your computer. This simple setting means that no one will be aware when you are online, and it doesn’t impact the other privacy settings you may have chosen.
You can only adjust your Appear Offline/Appear Online status on the computer app, not on the phone app, and not within your Quest 2 headset itself. Here are the step-by-step instructions to appear offline on Oculus Quest 2 using the Oculus desktop app.
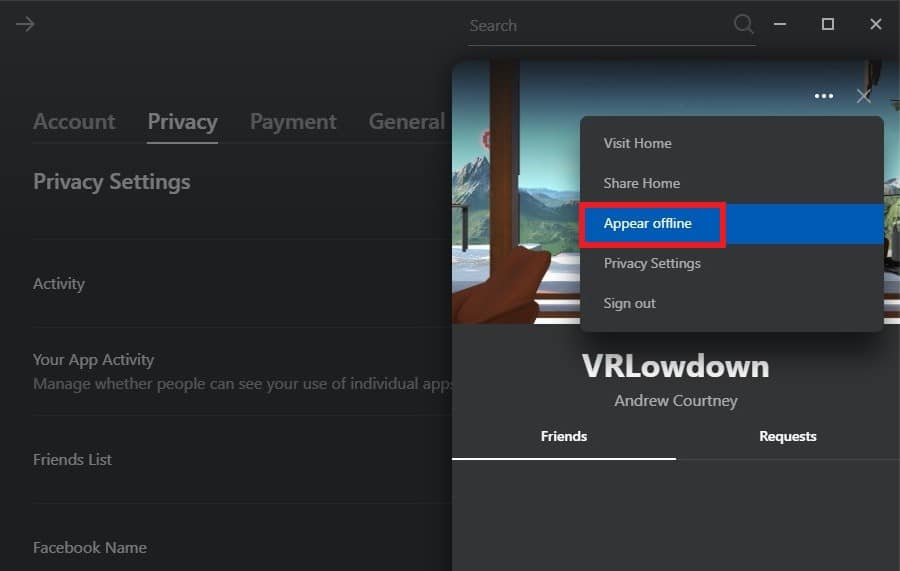
- Open the Oculus desktop app on your computer.
- Select the Friends button in the bottom left corner of the screen.
- The Friends tab should slide out from the right side of the screen.
- You will see your profile picture with a green dot indicating that you appear online to other users.
- Click on the three dots icon in the top right corner.
- Click on Appear Offline.
- The green dot will then disappear from beside your profile picture, indicating that you are now appearing offline to other users.
Whilst this method is great, it relies on you having a computer with the Oculus app installed. You are not able to adjust this setting on the phone app, on the Oculus website, or within the headset itself. This is a bit frustrating, as it is an otherwise easy way to toggle whether you are appearing online or not on Quest 2.
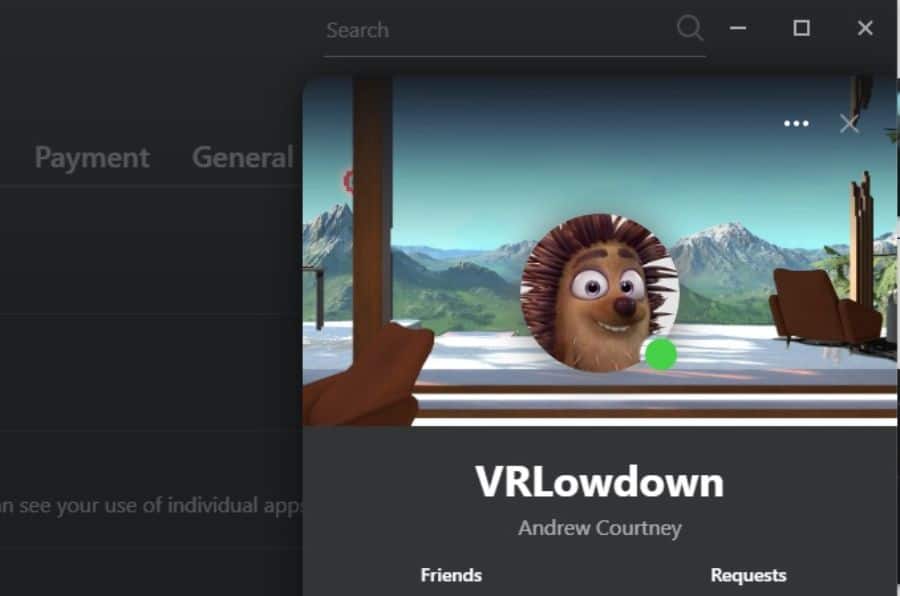
You can easily check whether you are currently appearing offline or online either within the Oculus desktop app or within your Quest 2.
- When wearing your Oculus Quest 2, press the Oculus button on your right controller to bring up the Oculus toolbar.
- Click on your profile icon on the left side of the toolbar. If you are online, you will see a green dot on the bottom right side of the profile icon, and if you have selected Appear Offline, there will be no dot.
One thing to bear in mind is that if you set your status to Appear Offline, then you also won’t be able to see when other users are online, so this may limit your ability to interact with your friends while using your Quest 2.
Another point to note is that even if you set your status to Appear offline, you will still be visible to other users in some Quest 2 apps, and you can still socialize and interact with others in multiplayer VR apps.
Adjust Your Privacy Settings On Oculus Quest 2 To Appear Offline
The other option to appear offline on Oculus Quest 2 is to adjust your privacy settings. Thankfully, Meta has developed a range of helpful privacy settings that provide similar privacy controls to Facebook.
You can adjust these settings directly on your Quest 2, on the Oculus smartphone app, on the Oculus desktop app, or on the Oculus website. You can use these settings to quickly toggle how visible you are to other users, as well as what information other users are able to see about you.
Here are step-by-step instructions for how to adjust your privacy settings to appear offline on Oculus Quest 2.
Adjust Your Privacy Settings On Oculus Quest 2
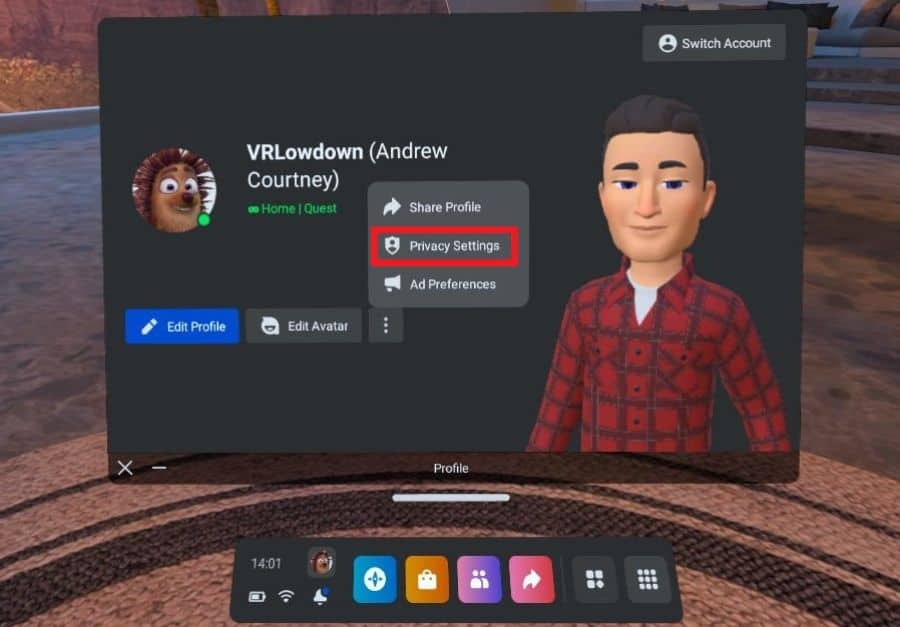
- Turn on your Quest 2 and put it on.
- Press the Oculus button on your right controller to bring up the Oculus toolbar.
- Click on your profile icon on the left side of the toolbar to bring up your profile settings.
- Click on the three dots icon to the right of the Edit Profile and Edit Avatar buttons.
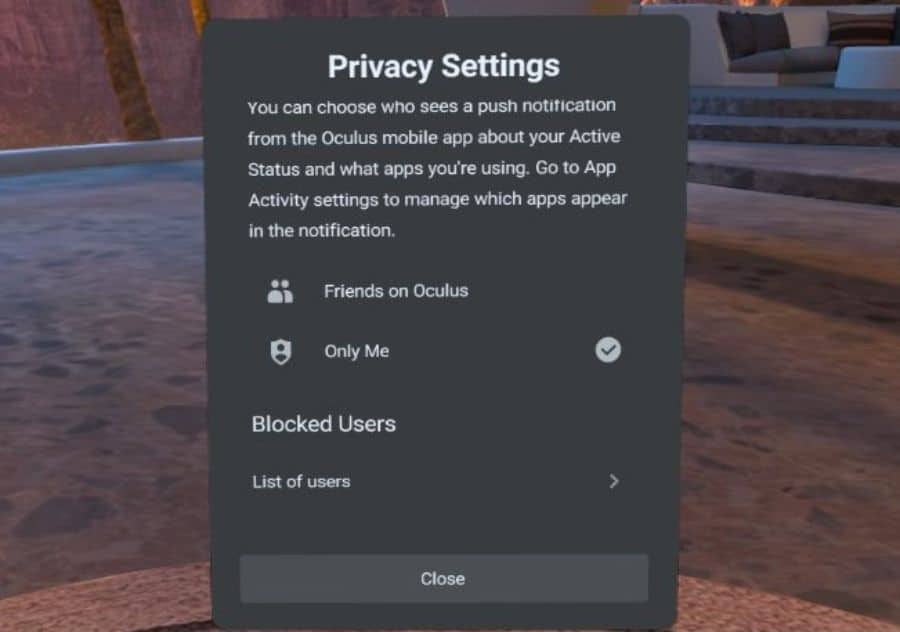
- Click on Privacy Settings.
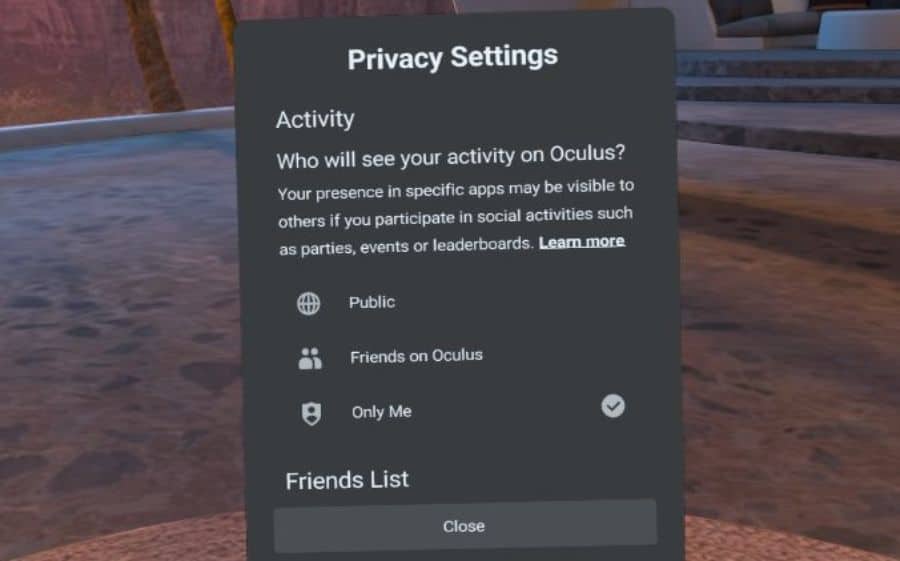
- You can now adjust a number of Privacy Settings including Activity, Friends List, Facebook Name, Active Status push notifications, and Blocked Users.
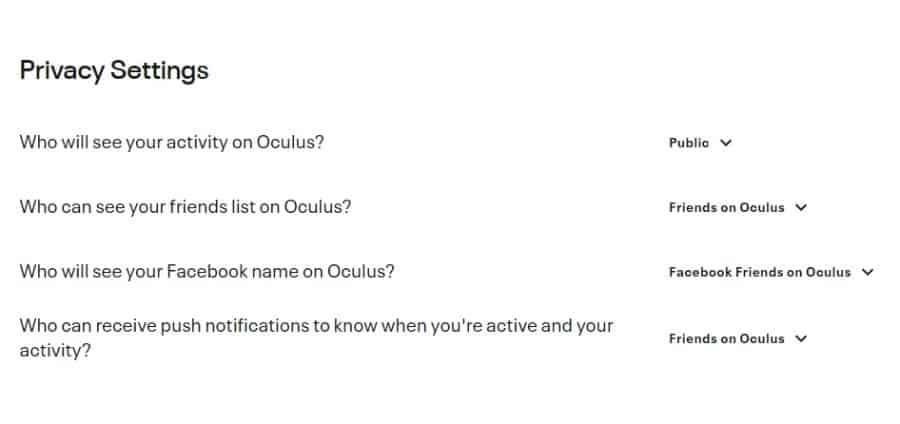
The main setting to appear offline is the Activity option. You can toggle this to change who will see your activity on Oculus. The options are Public, where everyone can see your activity, Friends on Oculus, or Only Me.
The Activity settings control who can see your use of Quest 2 and Oculus apps, downloads, achievements, high scores, and places that you visit in VR.
In addition to being able to appear offline, and controlling who can see your activity, you can also control who can see your Oculus friends list. Again, this can be toggled between Public, meaning anyone can see who your friends are on Oculus Quest 2, Friends on Oculus, meaning that your friends can see who else you are friends with on Oculus, and Only Me.
You can also control who will be able to see your Facebook name on Oculus. Control of this setting impacts who can access your real-world identity, so it is really helpful that meta allows you to have a separate Oculus user name from your real Facebook name.
The next setting, Active Status push notifications controls who gets informed about your Active Status and what apps you are using on your Oculus Quest 2. The options are limited to Friends on Oculus and Only Me, so you don’t need to worry about announcing to the world that you’ve played 20 hours of Beat Saber this week.
The last option is Blocked Users, which is a very helpful feature that shows you a list of any users you have blocked. The ability to block users allows you to prevent specific users from interacting with you or being aware of your activity while using your Oculus Quest 2.
You can view your list of blocked users within the privacy settings menu and you are able to remove someone from your blocked users list. You are not able to block new users from within the privacy settings menu, but I will show you how to block users later in this article.
Using the Oculus App To Adjust Privacy Settings And Appear Offline On Quest 2
You can also use the Oculus smartphone app to adjust your privacy settings and adjust whether you appear offline or online to other users on Oculus Quest 2.
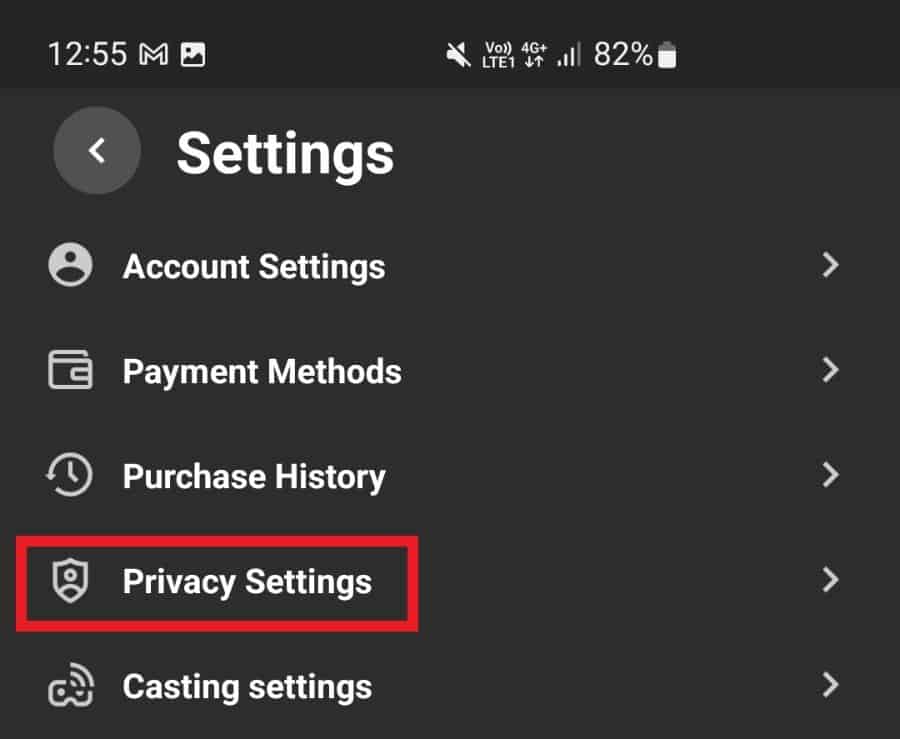
- Open the Oculus app on your smartphone and make sure that you are logged into your Oculus or Meta account
- Click on the menu button at the bottom right corner of the screen.
- Click on the Settings button and then select Privacy Settings from the list of options.
- You will be able to adjust the same privacy settings that you were able to within your Oculus Quest 2 headset, but there is one additional option that gives you greater control over your privacy.
Under the Activity settings, you can further customize your privacy settings on an app-by-app basis. You must have selected the “Public” or “Friends on Oculus” options to be able to adjust your activity settings on an app-by-app basis.
Click on the Your App Activity option, and you will be presented with a list of all the apps you have used on your Oculus Quest 2, and you can choose whether to show or hide your app activity by clicking the button next to each individual app.
Use the Oculus Desktop App
The third option to adjust your privacy settings on Quest 2, or toggle whether you appear offline or online, is to use the Oculus desktop app on a computer. Whilst the primary purpose of the Oculus Desktop app is to allow you to connect your Quest 2 to a VR-ready PC via Link cable or AirLink, you can install the Oculus desktop app on any PC and use it to adjust your Quest 2 settings, browse the Oculus store, or manage your profile.
The desktop app is the only place where you can change your status to Appear Offline on Oculus Quest 2 and also adjust all of your privacy settings, so it is well worth installing.
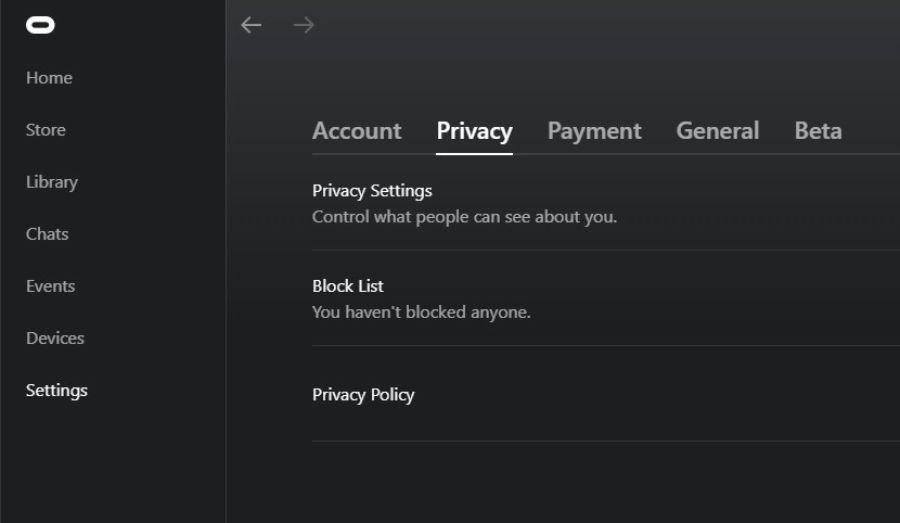
- Open the Oculus desktop app and ensure that you are logged into your Oculus/Meta account.
- Click on the Settings button from the menu on the left side.
- Select Privacy from the top menu, and then select Privacy Settings.
- You can then adjust all of your privacy settings as outlined previously.
Use The Oculus Website To Adjust Your Quest 2 Privacy Settings
The final option to appear offline on Oculus Quest 2 and adjust your privacy settings is to do this via the Oculus website. Follow these steps:
- Go to the Oculus website profile page and ensure that you are logged into your Oculus/Meta account.
- Select the Privacy Center from the list of options on the menu on the left side of the screen.
- Scroll down to Privacy Settings, and you will be able to adjust each of the individual privacy settings.
You are not able to adjust your activity settings on an app-by-app basis or change your status to Appear Offline on the Oculus website. You are only able to toggle Appear Offline on Quest 2 on the Oculus desktop app, and you can only adjust app-by-app privacy settings on the smartphone app or the Oculus desktop app.
How To Block Users On Oculus Quest 2
The easiest way to block a user from being able to see your activity or interact with you is to block them via the People app directly on your Oculus Quest 2 headset.
- Put your Quest 2 on and press the Oculus button on your right controller to bring up the Oculus toolbar. Select the People app from the toolbar. You can then go to the Recently Met tab, or use the search icon in the top right corner to search for the user you would like to block.
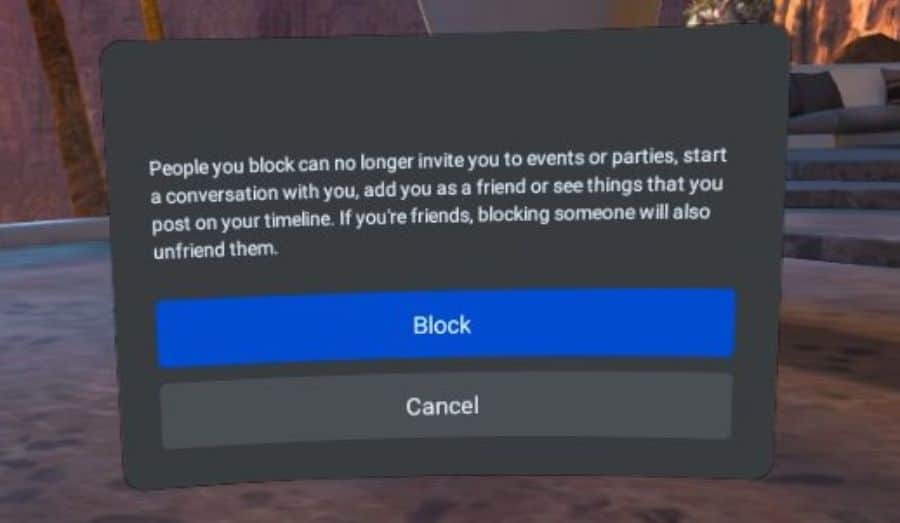
- Once you find the correct user, click on the Three Dots icon to the top right of their profile icon and select Block. This will prevent them from contacting you or seeing any of your activity. If you’re friends, blocking someone will also Unfriend them.
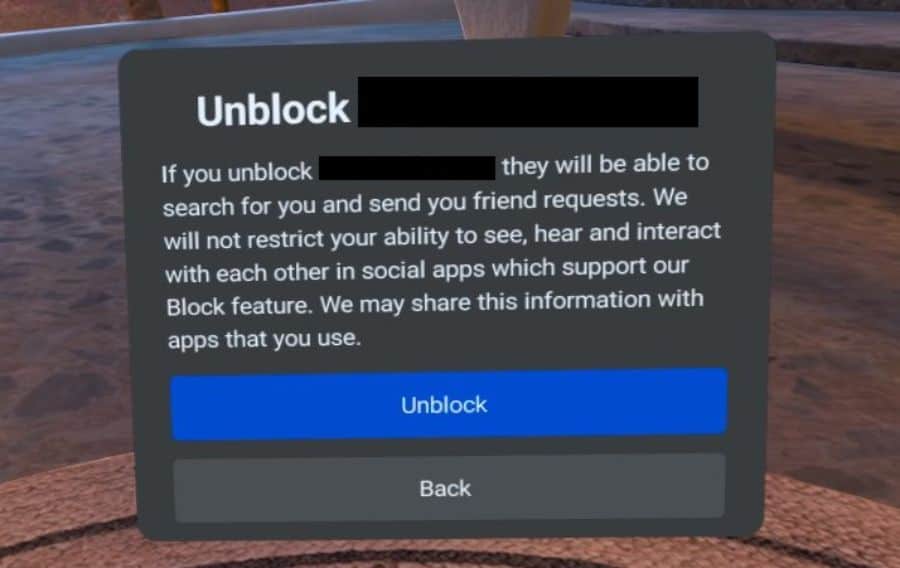
- If you decide you would like to unblock someone, you can do this via the Privacy Settings menu. You can access this either via the Settings menu, or you can click on your profile picture from the toolbar, click on the three dots icon and select Privacy Settings
- Scroll down to the bottom of this menu and under Blocked Users, select “List of users”.
- Click on the user that you would like to unblock and then click Unblock.
How To Block Users On Oculus Quest 2 Via The Oculus Smartphone App
You can also block and unblock users using the Oculus smartphone app.
- Open the Oculus smartphone app and ensure that you are logged into your Oculus/Meta account.
- Click on the Menu icon in the bottom right corner and then select People.
- Click on Find recently met users and scroll down until you find the name of the user you would like to block.
- Click on the user’s profile and select the three dots icon on the right of the screen.
- Click on Block and then click on Block again to confirm.
- You can unblock a user from the Oculus smartphone app via the Privacy Settings menu.
- Select Menu>Settings>Privacy Settings.
- Scroll to the bottom and click on List of users under Blocked Users.
- Click on the user that you would like to unblock and then click OK to confirm.