If you’ve got an Oculus (Meta) Quest 2 and you want to play games such as Half-Life: Alyx, you need to connect to a VR-ready PC via a Link cable or Air Link. However, if you don’t have a PC, or if yours doesn’t have the hardware to run Half-Life: Alyx, you may think that you’re out of luck. The good news is there is a great way to play Half-Life: Alyx on Oculus Quest 2 without a PC.
The best way to play Half-Life: Alyx without a PC is to connect your Quest 2 wirelessly to a cloud PC service and use Steam VR on this virtual computer. Plutosphere is a VR-focused cloud PC service that I have successfully used to play Half-Life: Alyx without a PC.
This article is going to explain the steps you’ll need to take to play Half-Life: Alyx on your Quest 2 without a PC, and also discuss the other ways to play this game on your Quest 2 VR headset.

What Are The Options For Playing Half-Life: Alyx on Meta Quest 2?
There are three main options to play Half-Life Alyx on Quest 2, but the first two require you to have a VR-ready PC. It’s the third option in this list that you’re going to learn about in this article.
- You can connect your Quest 2 to a VR-ready PC with an Air Link cable or suitable third-party cable. This creates a physical connection between your Quest 2 and your computer and allows you to play PCVR games in the same way that you would with a Rift headset or other PC-VR headset.
- You can connect wirelessly to a VR-ready PC with Oculus Air Link or Virtual Desktop. This creates a wireless connection in place of a wired connection and works surprisingly well. Air Link is my preferred method for playing PC-VR games with my Quest 2 headset.
- The third option is to connect your Quest 2 headset to a cloud PC service and use this remote PC to provide the graphical processing required to play Half-Life: Alyx, and other SteamVR games. The most popular options are Plutosphere and Shadow.
How To Use A Cloud PC Service To Play Half-Life: Alyx on Quest 2
Whilst there are a number of cloud PC services that can be used for VR gaming, the one I prefer to use is Plutosphere. This is a VR-focused cloud PC service, which makes it easy to use Steam and start playing your games as quickly as possible. The rest of this article will explain how you can use Plutosphere to play Half-Life: Alyx on Quest 2 without a PC, and I’ll share my thoughts about the pros and cons of this service.
I should note that this article is completely independent of Plutosphere, or any other service, and it simply represents my experience.
What Is Plutosphere?
Plutosphere is a cloud PC service that is focused on providing standalone VR headset users a way to connect to a gaming PC to play PC-VR content. It’s available to use around the world thanks to a wide variety of hardware locations that provide a low latency connection to your cloud PC.
It is a paid-for service, but you can either pay by the hour (currently between $1.5 and $2/hour) or pay for a monthly subscription that provides you with permanent cloud storage and 20 hours of playtime per month, with the option to buy more time as needed.
Considering that a VR-ready PC will cost upwards of $1500, the ability to pay a relatively low fee on a pay-as-you-go basis is pretty appealing. Being able to offload the demanding graphical processing that many PC VR titles require is a great option if you don’t have the required hardware available.
Plutosphere generally works very well, but it will be highly dependent on your location and hardware. Performance is generally good but is less suitable for games that require twitch reflexes such as rhythm games and FPS titles, due to the increased input lag, and very graphically intensive games that can struggle on the available hardware of cloud PCs.
Let’s run through the process for getting set up with Plutosphere so you can get playing. You can either use a PC or you can use an Android or iOS mobile device to complete the process.
Step By Step Guide To Playing Half-Life: Alyx On Quest 2 Without A PC
Please follow these steps carefully. There are a few things that you need to do in the correct order, so pay attention to avoid issues. Once you have the process figured out, it’s very simple.
Here are the things you’ll need to do to get started:
- You need a Meta/Oculus Quest 2 (or Quest).
- You must have a Steam account.
- You need a Wifi-6 (AX) or 5ghz (AC) wireless network with 50mbps minimum download speed.
- You need a ping of less than 75ms to an Amazon Web Services (AWS) server. (Test your ping here).
- You must have SideQuest installed on your Quest 2. Instructions for doing this are outlined below.
- You need an iOS or Android device with the SideQuest app on it, or a computer with SideQuest installed on it.
- You must sign up to use Plutosphere.
This may sound like a lot, but it’s a fairly simple process, and once you’re everything set up, you can play a wide range of games. Assuming that you have met the technical requirements of having a Quest device, a Steam account, a suitable WiFi connection and download speed, and your ping is less than 75ms, the first step is to set up SideQuest.
Step 1 – Install SideQuest

- You will need to install SideQuest onto your Quest 2 to be able to install the Plutosphere app on your Quest 2 VR headset. SideQuest is a hugely popular app that is used to install a huge variety of apps and games on your Quest 2 that don’t appear in the official Oculus store or App lab. I’d highly recommend all Quest 2 users install SideQuest as it provides you with a massive amount of additional content for your device.
- If using a computer, go to the SideQuest website, download the advanced installer, and install SideQuest on your computer.
- If using a mobile device, go to the relevant app store and install the SideQuest App.
- Once SideQuest is installed, you need to connect your Quest 2 to either your mobile device or computer with a USB-C cable and go through the setup process to install SideQuest on your device. This is a fairly straightforward process.
- Once you have connected your Meta Quest 2 to your mobile or computer via a USB cable, you can activate wireless mode, to connect via WiFi, and this will allow you to remove the cable, giving you more freedom.
Step 2 – Install The Plutosphere App On Your Quest 2
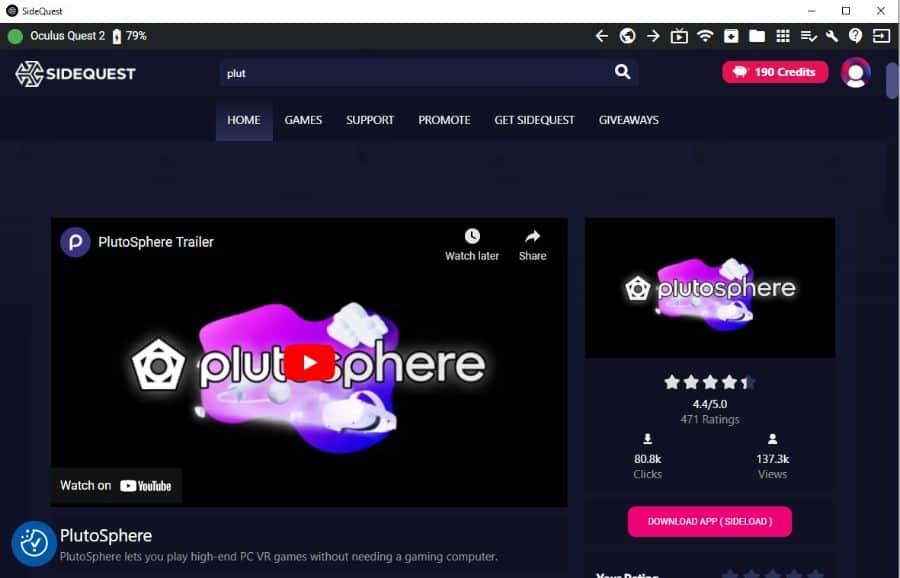
Open SideQuest and connect to your Quest 2 VR headset. Search for Plutosphere within SideQuest. Click on Download App (Sideload) to install Plutosphere on your Quest 2.
Step 3 – Setup Your Plutosphere Account
- Go to the Plutosphere website and click on the Sign-Up button. Choose a username and password, enter your email address, and click Register. You will need to confirm your email address to activate your account.
- The next step is to buy credits to use Plutosphere. You can purchase credits by the hour of game time, currently between $1.50 and $1.99 per hour. It’s a shame there is no free trial to let you test the service before spending money, but at least the cost per hour is low.
- Once you have purchased some tokens, you simply click “Start” from your Plutosphere dashboard. You will see the machine status changing to “Booting Up”, and then “Connecting”. You will see a timer below this and notice that it may take up to 15 minutes to connect to your machine. In practice, it normally takes 3-5 minutes to connect to your cloud-based PC.

- Thankfully, if you disconnect, or lose your connection, it will only take a few seconds to reconnect to your machine.
- Once you get confirmation that you are connected to your machine, just click the flashing monitor button to connect to your cloud-based VR PC.
- This will open a new browser window and inside it will be the desktop of your cloud PC.
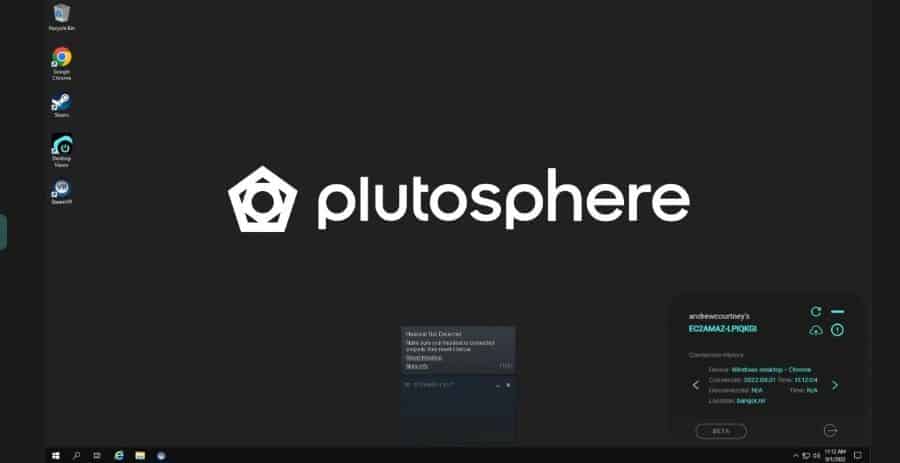
- There should already be a Steam window open prompting you to log in. Click “Log in to an existing account” and type in your username and password.
- This is simple if you are using a device with a physical keyboard, but if you are accessing your cloud PC on a mobile device, you will notice that no keyboard pops up when you click on the username box.
- Click on the green tab on the far left of the screen and click on the keyboard icon at the bottom of the menu to bring up the default keyboard on your device. This will let you input your username and password and connect to Steam.
Once you have logged into Steam, make sure that Steam VR is running. Make sure you have completed these steps before you try to load the Plutosphere app on your Quest 2.
Step 4 – Launch Plutosphere On Your Quest 2
Once your Cloud VR PC is running and Steam and Steam VR are loaded, pop your Quest 2 on and go to the apps menu. Use the drop-down menu in the top right corner to change the list of apps to “Unknown Sources”.
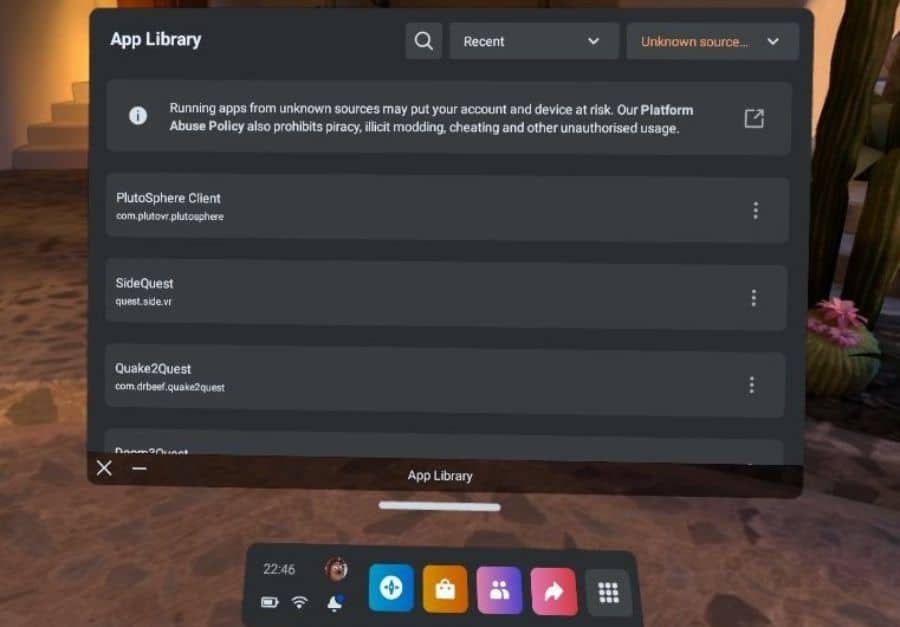
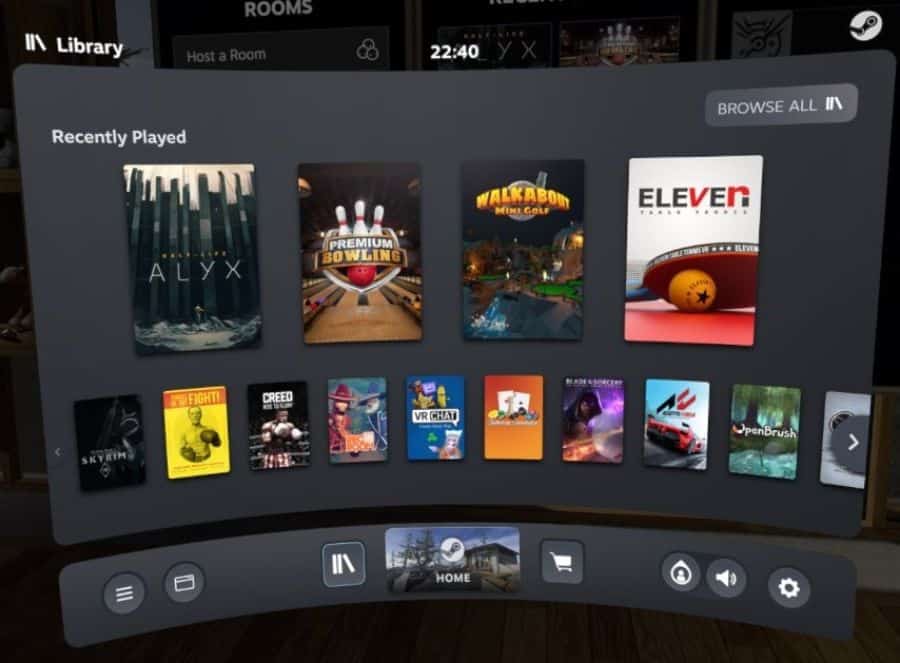
You should now see the Plutosphere app listed. Click on this and Plutosphere will load. You should hear some elevator music for a few seconds and then you should load directly into the SteamVR dashboard on your cloud PC. You will be able to go to your Steam Library or the store and install whatever game you want to play.
Once your game is installed, just click play, and you can start playing Half-Life: Alyx, or any other Steam VR game that you like.
I have tried about 15 different games using this service, and the performance has been pretty good. I found Half-Life: Alyx to be perfectly acceptable, although there was a little lag at times. Less graphically demanding games ran very smoothly, and it was almost impossible to detect that I wasn’t playing them on a local PC.
Plutosphere is definitely best for games that don’t require lightning-fast reflexes, as the small amount of input lag will put you at a disadvantage and can impact your performance. Anything that doesn’t require excessively twitchy reflexes should be fine.
Pros And Cons Of Plutosphere
Although Plutosphere and other PC streaming services such as Shadow are good options, they will not provide as good an experience as playing a PC-VR game on a local machine. However, where these services really shine is for those who don’t have a VR-ready PC but want to try out games and applications that are exclusive to PC-VR headsets.
Let’s look at some of the pros and cons of Plutosphere that I have noted during my time using it.
Pros Of Plutosphere
- I was able to play a range of PC VR games without a VR-ready PC.
- Available for users in most countries due to using Amazon Web Services (AWS) data centers, so most users will be able to connect to the service with a low ping.
- Can be accessed from most computers and mobile devices.
- Reasonable cost per hour and much cheaper in the medium term than getting a VR-ready PC.
Cons Of Plutosphere
- Technical knowledge required for setup.
- No free trial to see if the service works well for you before having to pay.
- High requirements for internet and WiFi speeds.
- The performance is not as good as playing on a local PC.
- You need to install your games each time unless you pay for permanent storage (Pluto drive).
Here is a really helpful video about Plutosphere from the popular VR Youtube channel, Cas and Chary. It covers all of the main features and discusses the pros and cons of the service.
Should You Use Plutosphere Or Other Cloud PC Services To Play Half-Life Alex On Quest 2?
If you have an Oculus/Meta Quest 2 and you really want to play Half-Life: Alyx without a PC, then this is a real solution, and it works pretty well for most people. The cost is reasonable, and the setup process isn’t too difficult. The performance will vary depending on your hardware and location, so it may work well for you or be completely unplayable depending on your circumstances.
It’s a shame that you need to pay right from the start, as a 1-2 hour trial would give new users much more confidence that they were getting something that will work for them. It also really grated on me that the first hour of my playtime was largely spent loading my virtual machine, installing the games I wanted to play, and getting over some minor technical challenges.
The other major negative is that you must sign up for a monthly subscription to be able to have permanent storage on your cloud PC. If you just buy tokens on a pay-as-you-go basis, you will need to download and install any game you want to play every time you use the service. Whilst the monthly fee is perfectly reasonable, it creates significant friction in attracting new users.
My advice would be to try the service for a few hours to make sure that the performance is acceptable and then sign up for the Pluto Drive subscription if you plan to use the service on an ongoing basis.
If you really don’t like the thought of a slightly long-winded setup process and some less user-friendly aspects of the service, you should probably give this option a miss, and just enjoy all of the wonderful content that can be played on your Quest 2 without a PC. If you just can’t resist the urge, you should definitely give it a go and see if you enjoy the experience.