If you’ve experienced lag and low FPS when playing Steam VR games, you’re probably getting a bit frustrated. Lag often has a huge impact on VR performance, as you need a smooth and consistent frame rate to have an immersive and comfortable experience. The good news is that this article will show you how to fix each issue that makes SteamVR laggy or causes low FPS.
The most common causes of laggy Steam VR performance are excessively high graphics settings, an underpowered computer, or problems with the cable or WiFi connection between your VR headset and the computer. Out of date drivers, or background software can also negatively impact your FPS.
Why Is Steam VR Laggy?
Whenever you get problems with lag in Steam VR games, the first thing to think about is when and where it is happening. You can narrow down the cause of the problem by thinking about when the lag started and where exactly you are experiencing it. Here is a list of the problems and solutions that this article is going to cover:
- Your computer and VR headset may need to be restarted.
- Your computer may not be capable of providing a smooth VR experience.
- Oculus Link cable problems.
- High graphics settings or demanding applications.
- You may need to enable motion smoothing.
- Ensure you are using USB 3.0 or higher.
- Disable Geforce Experience overlay.
- Close unnecessary background programs.
- Adjust the refresh rate of your Quest 2.
- Reinstall SteamVR.
- Update graphics and audio drivers.
- Poor WiFi signal with Airlink.
Restart Your Computer And VR Headset
If you’ve suddenly started getting lag when using Steam VR applications, the first thing to do is to completely shut down your computer and VR headset and restart them. There is a common issue with some VR headsets such as the HP Reverb G2, and Valve Index, where they will start lagging really badly but restarting will fix the problem.
Your headset will work fine most of the time, but occasionally, it will become very laggy. This typically happens immediately after turning on your headset, or just after quitting one game in Steam VR and loading another.
I have experienced this on quite a number of occasions, and restarting has always solved the issue. It is not entirely clear what the underlying issue is.
Check Your System Specifications
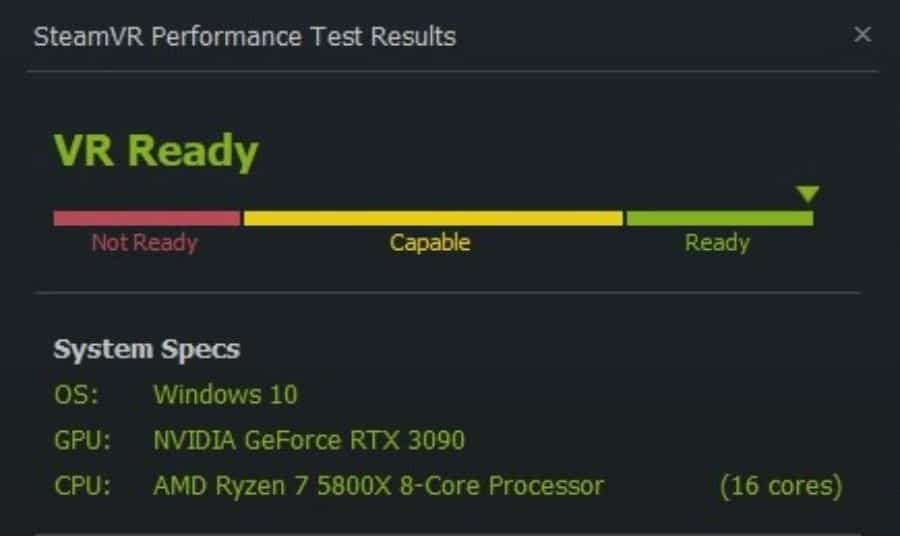
If your computer has insufficient hardware capabilities, particularly in relation to the CPU and graphics card, your Steam VR performance will suffer and you’ll experience a low frame rate and lag. One of the best ways to check if your computer is VR-ready is to run the SteamVR Performance Test. Search for this application on the Steam store and install it.
Run the application and your computer will be tested to see how it performs. You will then be given a series of results showing you how well your computer will handle VR content. If it looks like your computer is towards the lower end of the performance spectrum, you can reduce the graphics settings of the games you play, to improve FPS and reduce lag.
If your computer is well into the green part of the performance chart, it is more likely that there is another reason why your SteamVR performance is so poor.
Is The Oculus Link Cable Making Steam VR Laggy?
There is a specific issue with the link cable for Quest 2 that can make Steam VR laggy and seriously impact performance. Most people in this situation report no issues with their Quest 2 except when using the link cable to connect to their PC to use Steam VR content.
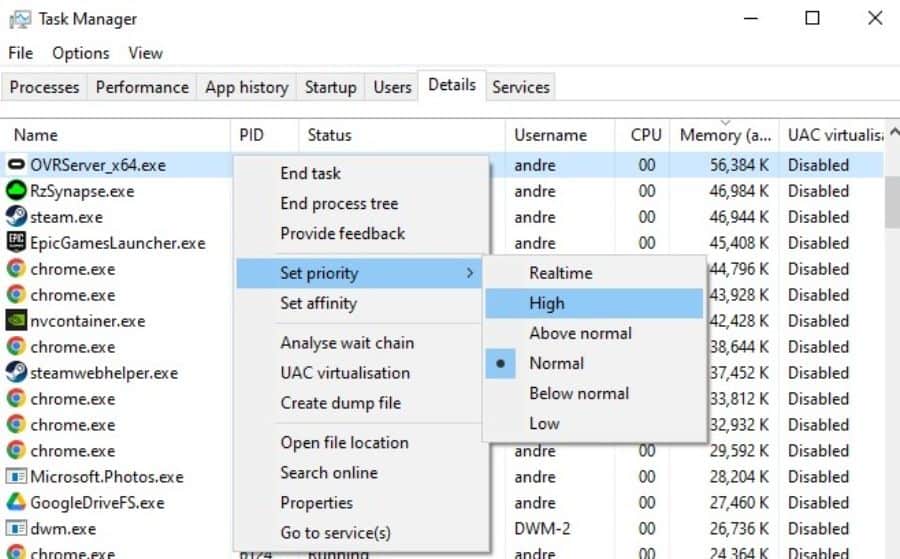
Thankfully, there is a good solution that works for a lot of people. All you need to do is change the priority of a process called OVRServer_x64.exe that runs on your computer. Here are the steps you need to take to fix this problem:
- Open Task Manager (Search for “Task Manager” in the Start menu, or right-click the taskbar at the bottom of your screen and select Task Manager).
- Go to the “Details” tab.
- Find the OVRServer_x64.exe process.
- Right-click on this and hover over “Set Priority”
- Select “High” and then close Task Manager.
Many users report that this completely resolves Steam VR laggy performance, but it doesn’t work for everyone. You will need to repeat these steps every time you restart, or you can install priority process saving software such as Prio (Process Priority Saver) to permanently save process priority.
Turn Down The Graphics Settings
One of the simplest things to try if you are experiencing low frame rates or lag while using SteamVR is to turn down some graphics settings to take some of the load off your graphics card. There are several simple ways to do this.
Reduce In-Game Graphics Settings
First, check to see if you can adjust the graphics settings in-game. You may be able to turn off anti-aliasing, reduce the render scale, reduce graphics effects, and reduce the resolution of the output to your computer monitor while you are using your VR headset. This is particularly important for VR rhythm games such as Beat Saber, where timing is crucial, and even a little lag can significantly affect your performance.
Reduce Render Resolution
Reducing the render resolution within Steam lowers the resolution at which the game is rendered, before being upscaled or downscaled to the resolution of your VR headset. Increasing the render resolution generally improves visual clarity, but is much more graphically demanding. Decreasing this reduces the burden on your computer and will improve your frame rate and reduce lag.
You can reduce the render resolution for individual games, or you can change the settings for all SteamVR games. To change global render resolution settings, enter the SteamVR settings menu while your VR headset is connected. Adjust the slider for “Resolution Per Eye” as shown below. Individual game settings can be adjusted by opening the Steam menu in-game and navigating to the video settings menu.
Try reducing the render resolution quite dramatically at first to see if this has a major impact, and then increase it slowly to see if this fixes your laggy Steam VR performance.
Bear in mind that there are some games where even the most powerful computers will struggle to maintain smooth VR performance, including one of my favorite VR games, DCS.

Enable Motion Smoothing
Motion smoothing is a great setting within SteamVR which will smooth performance effectively whenever your frame rate can’t consistently achieve the native refresh rate of your VR headset.
When motion smoothing is enabled, your computer renders the application at half the frame rate of your VR headset’s displays, and the frames in between are estimated. For example, if your VR headset has a refresh rate of 90Hz, motion smoothing fixes the computer-rendered frame rate at 45 fps but delivers 90 fps to your headset.
This dramatically reduces the processing requirements and maintains smooth gameplay, while only producing minor visual artifacts. You can turn on motion smoothing for all applications within the SteamVR settings menu, or for individual applications if desired.
Make Sure You Are Using USB 3.0
If your headset uses a USB cable to connect to your computer, it is important to ensure that both the cable and USB port being used are USB 3.0 or higher. If you are using the wrong type of cable or USB port, data transfer rates will be greatly restricted and this can make Steam VR laggy and performance will suffer.
If you plug a USB 2.0 cable into a USB 3.0 port on your computer, it will work for charging and data transfer, but the data transfer speed will revert to USB 2.0 speeds. You must use a USB 3.0 or higher cable along with a USB 3.0 or higher port to ensure that data transfer speeds will be sufficient for high-performance VR.
Problems can also arise if you use a USB adapter or extender when connecting to your computer. If the connection is deemed insufficient when connecting, the USB device will work in compatibility mode, rather than at full USB 3.0+ speeds.
If you think your USB connection could be an issue, make sure you are using the right cable and check to ensure the port on your computer is a USB 3.0 or higher port. There are also situations where certain USB ports on computers can cause issues, so you should try all available USB 3.0 or higher ports to see if this fixes your problem with poor performance and lag when using Steam VR.
Background Programs Can Make Steam VR Laggy
Anything that increases the processing demands on your computer can result in laggy Steam VR performance and low FPS. Some background programs can intermittently or constantly use system resources, and this will impact your VR experience by causing lag or fluctuations in your frame rate.
Load up Task Manager again and look for any processes that are running that could potentially be closed. There are likely to be some programs that load in the background when you start your computer, so you should try closing these and consider adjusting their settings so that they don’t run automatically in the background.
In my case, I found Discord, The Epic Games Store, Skype, and Corsair ICUE software running which could be closed, potentially improving the performance of my computer while using VR. Other common culprits are antivirus and hardware monitoring software.
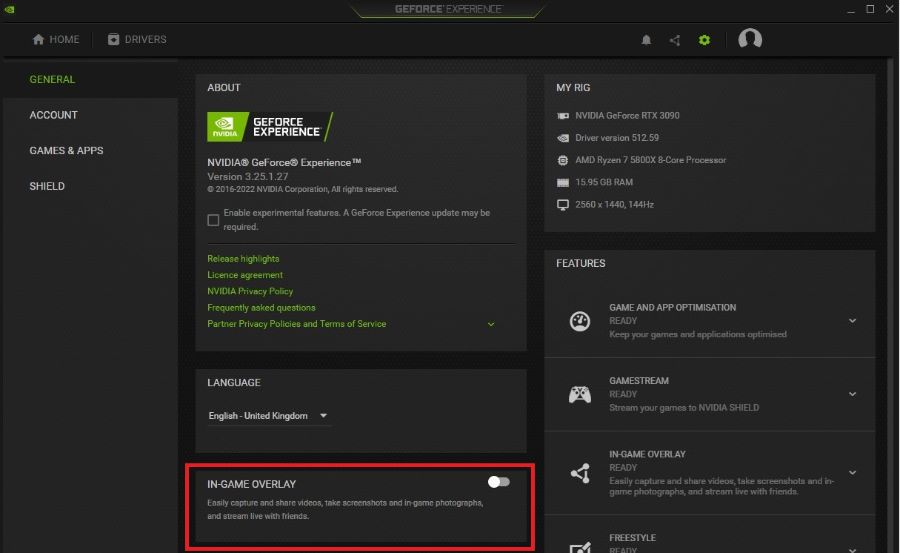
Disable GeForce Experience Overlay
If you have an NVIDIA graphics card, the GeForce Experience overlay that often runs in the background can make Steam VR laggy, so you should ideally turn this off.
- Open the GeForce experience software by right-clicking on the NVIDIA icon in your notification bar and selecting NVIDIA GeForce Experience.
- Click the cog icon in the top right corner to go to the settings menu.
- Turn off the in-game overlay option.
Reinstall SteamVR
Sometimes SteamVR itself can be the cause of lagging when using VR in Steam. If you’ve tried all the simple measures above, I would recommend reinstalling SteamVR. This only takes a few minutes but has fixed laggy Steam VR performance for many people. Here are the steps you should follow;
- Close Steam and SteamVR.
- Before you uninstall Steam, it is best to manually delete the following files from your computer. Steam is on my “C” drive, so the exact path may differ depending on where you have Steam installed.
- C:\Program Files (x86)\Steam\steamapps\common\SteamVR\resources\settings\default.vrsettings
- C:\Program Files (x86)\Steam\config\steamvr.vrsettings
- C:\Program Files (x86)\Steam\config\lighthouse\lighthousedb.json
- Once you have deleted these files, open Steam and uninstall SteamVR by doing the following:
- Right-click on SteamVR in your Steam Library
- Hover over “Manage” and then click “Uninstall”
- Confirm that you want to uninstall by Clicking “Uninstall”.
- Now go to the folder that SteamVR was installed in on your computer and delete the entire SteamVR folder. This will get rid of any leftover files. The default location of this folder is “C:\ProgramFiles(x86)\Steam\steamapps\common\SteamVR”
- Now go back to your SteamVR library and search for SteamVR. It should still be listed with other programs that you own but do not currently have installed.
- Reinstall SteamVR and then check to see if this has resolved your Steam VR laggy performance.
Adjust The Refresh Rate Of Your Quest 2
A number of users have reported significant improvements in the amount of lag they experience in SteamVR by simply adjusting the refresh rate of their Quest 2 headset. Logically, reducing the refresh rate should decrease the hardware requirements, and reduce stuttering, but people seem to be having success with adjusting the refresh rate both upwards and downwards.
I haven’t been able to work out why this seems to work for some people, but it is well worth trying this SteamVR lag fix to see if it works for you.
Update Graphics And Audio Drivers
Using out-of-date audio or graphics drivers can result in low FPS, lag, or even crashing of Steam VR games. You should check to ensure that you have the most recent graphics and audio drivers installed for your computer. The two main graphics card manufacturers have software to download and install up-to-date graphics drivers and keep the drivers up-to-date.
- Download the AMD software for driver updates if you have an AMD graphics card.
- Download GeForce Experience if you have an NVIDIA graphics card.
Poor WiFi Signal With Airlink
Many people choose to use Airlink with Quest 2 to connect to a VR-capable PC over Wifi. Whilst this is a great option, works well for a lot of people, and negates the need to have a cable tethering you to a computer, performance can be variable, depending on your WiFi connection.
You should make sure your setup meets the requirements for Airlink. These are;
- Your PC should be connected to your router or access point via an Ethernet cable.
- Your router must support Wi-Fi AC or AX (Wi-Fi 5 / 802.11AC or Wi-Fi 6 / 802.11AX).
- Your headset must be connected to a 5 GHz Wi-Fi band.
- Your router should be in the same room as the headset or in line-of-sight, and at least 1m off the ground.
- Don’t use a mesh network configuration (extenders, etc).
If you think a poor WiFi signal could be the cause of Steam VR being laggy on Quest 2, you should try playing the same game using the link cable to see if this improves performance. If it does, this helps to clarify that it is definitely a WiFi issue causing problems.
Try Using Virtual Desktop
Airlink isn’t the only option to connect your WiFi-capable VR headset to your PC, and some people report better performance using alternatives such as Virtual Desktop. This is a really popular option for Quest 2 users, and there is a quest 2-specific version of it available on the Oculus store.
Last Word
Other than having a computer that doesn’t meet the requirements to run VR games, most other issues causing lag or low FPS in Steam VR games and applications can be fixed by working through the above solutions. If your problem has not been resolved by working through the solutions in this article, I would recommend reaching out to the support team for your VR headset, who may be able to help further.