Air Link allows you to wirelessly connect the Quest 2 and other standalone Meta VR headsets to a VR-ready PC, allowing you to enjoy PC VR content wirelessly, without being tethered to your computer by a cable. This is a game-changer for virtual reality, but it’s important to have your hardware and software set up perfectly to enjoy a flawless experience, and there are multiple things that can make Oculus Air Link laggy or cause stuttering.
To prevent laggy Air Link performance, use a Wi-Fi 6 router placed in direct line of sight to your headset, connect to 5GHZ Wi-Fi, ensure your computer has a wired connection to your router, and reduce the Air Link bitrate if needed. Ensure your Oculus software and graphics drivers are up-to-date.
This article is going to help you get rid of any lag or stuttering you are experiencing with Air Link, to ensure that you have an enjoyable VR experience. Let’s get started.
14 Ways To Stop Oculus Air Link From Being Laggy
Lag or stuttering is a common issue when using Air Link, but is normally caused by a problem with your hardware or software setup that can easily be resolved. I am confident that if you follow the advice in this article, you can be enjoying smooth, low-latency wireless PC VR.
Let’s start with a quick checklist of the most common ways to fix lag and stuttering with Oculus Air Link.
- Use A Wi-Fi 6 or Wi-Fi 5 (AC or AX) Router
- Connect Your Computer To Your Router By Ethernet Cable
- Put Your Router In Direct Line Of Sight
- Connect Your Headset To The 5GHZ Wi-Fi Channel
- Avoid Using Wi-Fi Range Extenders Or A Mesh Network
- Reduce The Bitrate Of Air Link
- Use The Oculus Debug Tool To Set The Encode Bitrate To 0
- Update The Oculus Software On Your VR Headset
- Update Your Graphics Drivers
- Set “OVRServer_x64.exe” Process Priority To High
- Check The Hardware Requirements Of The Game You Are Trying To Play
- Try Virtual Desktop As An Alternative To Air Link
- Update Windows
- Reboot Your Router
Use A Wi-Fi 6 or Wi-Fi 5 (AC or AX) Router
The speed and latency of your Wi-Fi connection are crucial to the performance of Air Link. Ideally, you should have a Wi-Fi 6 router, although a Wi-Fi 5 router will also work, and both will provide a much faster data transfer speed and lower latency than older routers.
Whilst Air Link uses significant data compression to minimize the data that needs to be transferred, it is still dependent on transferring a lot of data, and older routers will not be able to keep up, resulting in increased latency, more visual artifacts, reducing the visual quality of your VR experience.

Connect Your Computer To Your Router By Ethernet Cable
Wired network connections are almost always faster than wireless connections. Whilst we are trying to eliminate the wire between your Quest 2 or Quest and your VR-ready PC, a wired connection is essential for the rest of your network. This means that your computer should have a wired connection to your router. This does not have to be a direct cable from one to the other. As long as they are both wired into the same physical network, this will work well.
Put Your Router In Direct Line Of Sight
I strongly recommend that you put your router in the same room as you are using your VR headset, ideally in direct line-of-sight to your headset. As the distance between your VR headset and your router increases, particularly if there are walls and other obstacles in the way, latency increases, and data transfer speeds decrease. This can result in lag and reduced image quality.
I currently get an average latency of 50ms using Air Link with an ideal hardware setup. This is higher than connecting my Quest 2 with the Link cable to my computer, but I still can’t detect any latency at all when playing VR games. However, even moving into an adjacent room will increase the latency up to 60-70ms, and as this increases, Oculus Air Link gets increasingly laggy.
Most people don’t have their router in the same room as they use their VR headset, but there are several solutions.
Firstly, you can purchase a second router or Wireless Access Point and put it in the same room you use your VR headset in. As long as it has a wired connection to your main router, this will work well. I purchased the Zyxel True Wi-Fi6 AX1800 for exactly this purpose, and I have positioned it about 1.5m off the ground in the same room where I use my Quest 2 in. It’s blisteringly fast and enables me to have a perfect Air Link experience. You can configure this to be on the same Wi-Fi network as the rest of your home network, or you can just run it as a separate Wi-Fi network.
The other option is to get a Wi-Fi dongle, such as the D-Link VR Air Bridge. This connects to a USB port in your computer and provides fast and low-latency Wi-Fi so you can enjoy an excellent connection between your VR headset and your computer.
Connect Via 5GHZ Wi-Fi Channel
Most modern routers allow you to connect to Wi-Fi in either the 2.4GHZ or 5GHZ band, but it is important to connect your Quest 2 to the 5GHZ band, as this provides significantly higher bandwidth and is less prone to interference from other devices.
You can check whether your VR headset is connected to 5GHZ Wi-Fi by going to the Quick Settings menu and selecting Wi-Fi, or going to the Settings menu, then System settings, then Quest Link. You will find info regarding the type and strength of your Wi-Fi connection.
Reduce The Bitrate Of Air Link
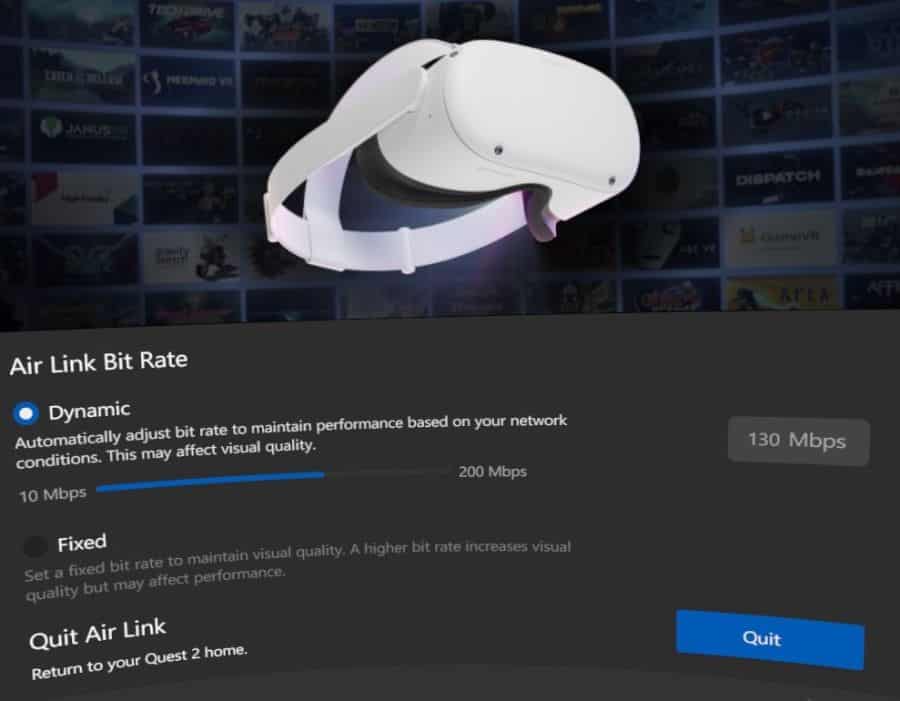
If you have optimized your router and network setup as much as possible, but you are still getting some lag, you should try adjusting the Air Link bitrate to see if this solves the problem. You can change this by going to the Air Link menu on the left side of the Oculus dashboard when you are using Air Link.
The bitrate can either be set to dynamic, in which case the software will balance picture quality and latency, or you can adjust this manually. You should try setting the bitrate to the lowest setting on manual and see if this stops Air Link from being laggy. Obviously, this will reduce the quality of the picture, but you can then gradually increase the bitrate to find a good compromise between quality and latency.
Avoid Using Wi-Fi Range Extenders Or A Mesh Network
As previously mentioned, Wireless VR only works well when the latency of your connection is kept to a minimum, ideally less than 50ms. Another source of increased latency is where your network uses Wi-Fi extenders or a Mesh network. Both of these technologies result in additional latency as the signal crosses the part of your network that is not hard-wired, and for wireless VR, will cause you to experience a lot of lag.
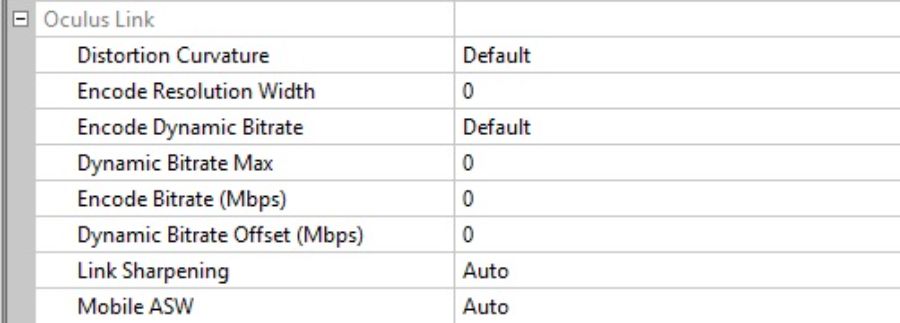
Use The Oculus Debug Tool To Set The Encode Bitrate To 0
Another step that can make a dramatic difference to some people struggling with Air Link being laggy is to use the Oculus debug tool to set the encode bitrate to 0. Navigate to the folder on your computer where you have the Oculus software installed. Open the Oculus Diagnostics folder, which can be found in the following place by default.
C:\Program Files\Oculus\Support\oculus-diagnostics
Load OculusDebugTool.exe and change the Encode Bitrate (Mbps) line to 0, if it is not already. If this was set to a high level like 300 or higher when you opened the program, it is highly likely that this is making Oculus Air Link laggy.
Once you have changed this setting, you can test Air Link again and see if this has solved the issue.
Update The Oculus Software On Your VR Headset
The Air Link software changes and improves with every iteration of the Oculus software on your headset. Ensuring that you are running the most up-to-date software on your headset can prevent a lot of common Air link problems, including lag and stuttering.
- Go to the Settings menu on your headset
- Navigate to the System settings, then the Software Update tab.
- This will show you whether there is a software update available.
- If an update is needed. click Update and Restart to install the update.
Update Your Graphics Drivers
Once you connect to your VR-ready PC with Air Link, you start using the graphical processing power of your computer, rather than the onboard hardware of your Quest 2. As a result, it is very important to update your graphics drivers to the most recent ones, as both AMD and Nvidia are constantly fixing bugs and improving performance, particularly with newer technologies and games.
The best way to update your graphics drivers is to download the AMD software if you have an AMD graphics card and to download GeForce Experience if you have an Nvidia graphics card.
Open the software and check for driver updates. If there is a more recent driver available for your graphics card, you will be able to download and install it. You will also be able to set this software to automatically keep your graphics driver up-to-date.

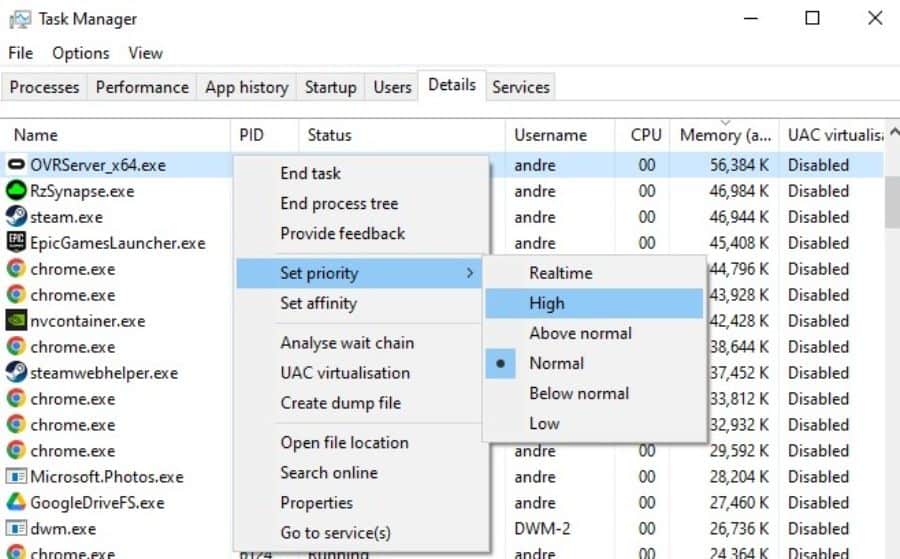
Set “OVRServer_x64.exe” Process Priority To High
There is a specific issue that can cause laggy Air Link performance, particularly when playing Steam VR content on the Meta Quest 2. The solution is to change the priority of the OVRServer_x64.exe process that runs on your computer while using Air Link. Here are the steps you need to take to fix this problem:
- Open Task Manager (Search for “Task Manager” in the Start menu, or right-click the taskbar at the bottom of your screen and select Task Manager).
- Go to the “Details” tab.
- Find the OVRServer_x64.exe process.
- Right-click on this and hover over “Set Priority”
- Select “High” and then close Task Manager.
You will need to repeat these steps every time you restart your computer, or you can install software such as Prio (Process Priority Saver) to permanently save process priority.
Check The Hardware Requirements Of The Game You Are Trying To Play
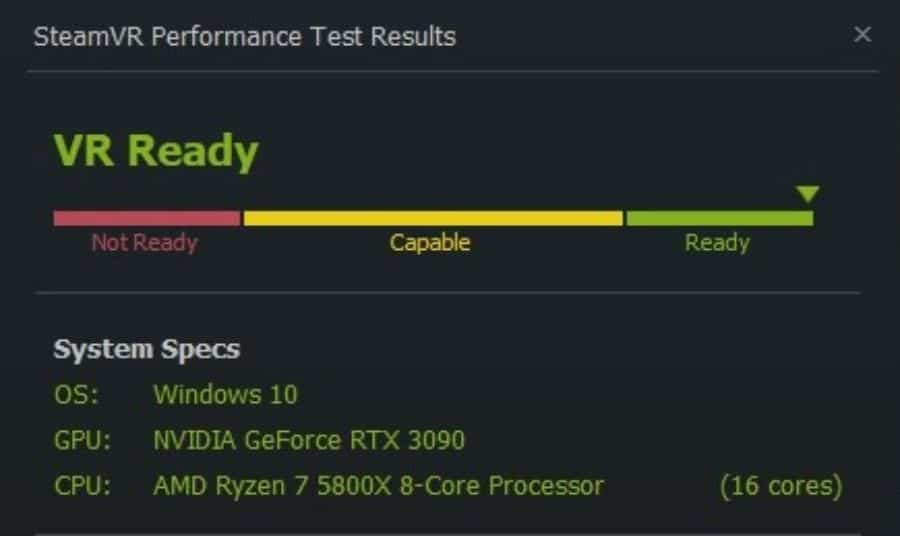
It’s entirely possible that the lag and stuttering you are experiencing with Air Link is due to your computer struggling to run your game or application. Running a PC VR title on the Quest 2 over Air Link requires almost as much graphical processing power as running a game on your computer in 4K at 90fps.
For the majority of games, this will require a reasonably high-end computer, so you may have to think about turning down some graphics settings to keep the action smooth. You could consider using a performance overlay tool such as FPSVR to check what frame rate you are achieving and adjust the graphical settings to try to hit a more reasonable frame rate. You may also wish to use the SteamVR Performance Test to see whether your computer is powerful enough to handle PC VR.
Try Virtual Desktop As An Alternative To Air Link
Air Link isn’t the only option that lets you enjoy wireless PC VR content with your Quest 2 or other standalone VR headset. Virtual Desktop is another great option and has actually been around for much longer than Air Link has been. Although there are a to of similarities, they are also different in a lot of ways, and your performance may be much better with one over the other.
Having tested both Air Link and Virtual Desktop extensively, I typically get slightly reduced latency with Virtual Desktop than with Air Link. Whilst both provide great performance for me, there are plenty of people that report terrible performance with one, but excellent performance with the other. Much of this will be down to the wide variety of hardware and software setups that can impact performance.
The only downside of Virtual Desktop is that it is a premium product, normally costing $20/£15, compared to Air Link, which is integrated into the Oculus software and is entirely free. If you’ve been through everything in this article and your performance with Air Link is still below what you would like, I would strongly recommend that you give Virtual Desktop a go. In fact, if the price is taken out of the equation, I generally consider Virtual Desktop to be the better option.
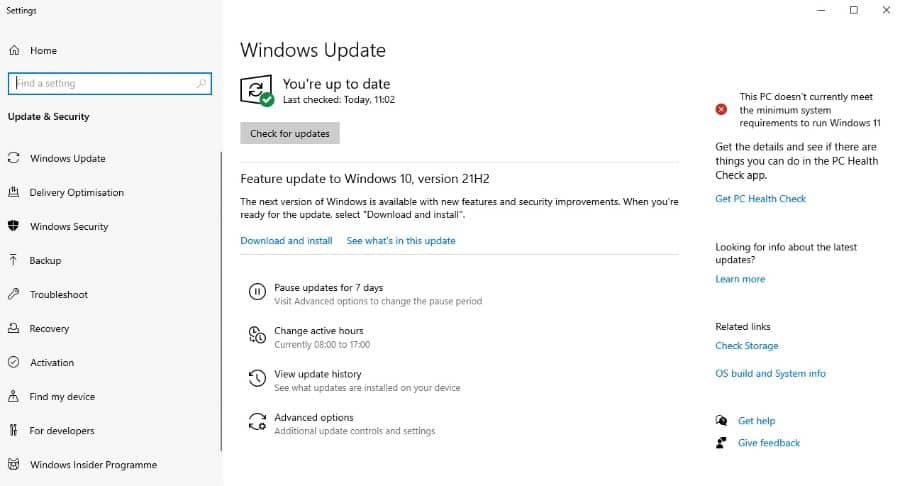
Update Windows
Another thing that is well worth doing, and can often lead to the resolution of problems causing Air Link to be laggy is to download and install any outstanding Windows updates. Click on the Start menu and type “check for updates” and then open the system settings menu of the same name. You can then download and install any outstanding Windows updates, which may help your Air Link performance, but is also a good idea for the smooth functioning of your computer.
Reboot Your Router
If you haven’t already done this, it is usually worth rebooting your router if you find Air Link laggy. As with all hardware, it’s amazing how often turning it off and on again can fix problems that seemed otherwise impossible to fix.
Why Is Oculus Air Link Freezing?
The most likely cause of Air Link freezing or performing extremely poorly is that the bitrate is set much too high, either in the Air Link settings or in the Oculus Debug tool. It can also be caused by outdated Oculus software or graphics drivers. You should also ensure that your router and network setup is optimized.
How To Improve Oculus Air Link Performance
Oculus Air Link performance is highly dependent on the latency and bandwidth of your Wi-Fi and network connection. Most people will find Oculus Air Link laggy once latency gets much above 50ms, and even with a perfect setup, it is tough to get much below this. As a result, even a slightly suboptimal connection can degrade your experience, causing lag and stuttering.
The most important things to do to improve Oculus Air Link Performance are:
- Use a Wi-Fi 6 router and place it as close as possible to your play space, and in direct line of sight of your headset while playing.
- Connect to the 5GHZ Wi-Fi band.
- Ensure your computer has a wired connection to your router.
- Reduce the bitrate of your Air Link connection if latency is a problem.